I picked up my family pack of Snow Leopard on August 28th - the day it came out. I have been reading about it for months and the feedback had been predominantly positive so why wait?
First upgrade was my laptop. I didn't bother to close down any applications, I just popped in the CD and a few mouse clicks later the upgrade was in motion. Almost precisely 40 minutes later Snow Leopard was up and running. Immediately I opened a bunch of apps and tried some of the new dock and expose features. Everything worked wonderfully. The final test was to leave all those apps running and see how fast it shut down. This was a big improvement! I took about 7 seconds to power off - that is way, way faster than before.
Saturday afternoon I upgraded to Snow Leopard on my iMac. Again, just a few mouse clicks to get it running and about 45 minutes later it is all done with nary a glitch. Impressive. I have used and supported Windows since the very early days of that operating system and I have never had an upgrade go so smoothly on one PC let alone two.
The biggest Snow Leopard changes were under the hood so not much new stuff was readily visible after booting up. I had read about a bunch of tweaks and improvements so of course I gave them a quick spin. Everything worked as advertised. There was, however, one nice surprise along the way. When I bought my Hoodman RAW-FW8 a few weeks back I was a bit annoyed to discover that I had to turn on my external hard drive (to which the Hoodman was daisy chained) in order to see the unit. After upgrading to Snow Leopard the Hoodman now shows up properly when I insert a CF card without me having to turn on the external hard drive. Small fix, big happiness.
Overall I'm happy with the upgrade. The new O/S has a crisper feel than Leopard and the tweaks and improvements I have tried are great. I expect I will come across more "oh, that's nice" moments as I get to know it better over the next few weeks.
Mac World has complete coverage of Snow Leopard here. And a review from PCMag.com can be found here.
I have to wonder if the Windows folks will have it so good when their new O/S comes out in October. I guess we'll find out soon enough. :)
Sunday, August 30, 2009
Thursday, August 27, 2009
The Shadow Knows...
John Chandler, a photography instructor of mine, once asked the class, "what is in 95% or more of the pictures you take?". There were many answers, some sensible, some crazy but the correct one was... wait for it... shadow.
Huh, who knew??
So the assignment for that week was to take a picture where the shadow was the subject. Hmmmmmm. I think for the next four days the city was covered in thick, white cloud making the really beefy shadows scarce if not gone altogether. By "beefy" I mean the long, strong, thick shadows you only get at sunrise and sunset. Anyhow after days of little success I was finally able to nab this shot on the way to work.

Nothing super terrific but it completed the assignment.
Tonight was different. Six months and plenty of shots later my eye is a bit more tuned to spotting great light and the accompanying shadow. Nearing sunset I came across a bike leaning against a brick wall. The shadow initially peaked my interest but as I looked around the frame the color and the lines drew my eye. Below was the first shot.

Not a bad shot but it doesn't tell the whole story.
I started to move around a bit, recomposing the image and looking around the frame. Then I saw the best shadow of all: the tree! I zoomed out wider and turned the camera to portrait orientation and this is what I got.
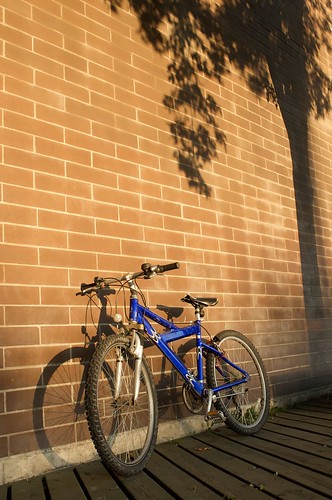
Much better! The tree absolutely makes the shot. It frames the picture, adds interest and completes the story.
Making this picture tonight made me think of a couple of tips to share.
1. Don't just stick with one idea, one composition. Shoot tight. Shoot wide. Landscape. Portrait. Add elements. Subtract them. When you start to look beyond the subject so many more possibilities emerge.
2. Shadow is already in most of your pictures anyhow so why not use it to your advantage? It can augment the story, complete it, or, it can even be the story all by itself.
Awesome.
Huh, who knew??
So the assignment for that week was to take a picture where the shadow was the subject. Hmmmmmm. I think for the next four days the city was covered in thick, white cloud making the really beefy shadows scarce if not gone altogether. By "beefy" I mean the long, strong, thick shadows you only get at sunrise and sunset. Anyhow after days of little success I was finally able to nab this shot on the way to work.

Nothing super terrific but it completed the assignment.
Tonight was different. Six months and plenty of shots later my eye is a bit more tuned to spotting great light and the accompanying shadow. Nearing sunset I came across a bike leaning against a brick wall. The shadow initially peaked my interest but as I looked around the frame the color and the lines drew my eye. Below was the first shot.

Not a bad shot but it doesn't tell the whole story.
I started to move around a bit, recomposing the image and looking around the frame. Then I saw the best shadow of all: the tree! I zoomed out wider and turned the camera to portrait orientation and this is what I got.

Much better! The tree absolutely makes the shot. It frames the picture, adds interest and completes the story.
Making this picture tonight made me think of a couple of tips to share.
1. Don't just stick with one idea, one composition. Shoot tight. Shoot wide. Landscape. Portrait. Add elements. Subtract them. When you start to look beyond the subject so many more possibilities emerge.
2. Shadow is already in most of your pictures anyhow so why not use it to your advantage? It can augment the story, complete it, or, it can even be the story all by itself.
Awesome.
Wednesday, August 26, 2009
This is cool!
I saw this video a while back but it is certainly worth watching again. It's Clay Enos showing how to do street portraits.
Monday, August 24, 2009
Sometimes it just doesn't happen...
I spent a couple of hours on Sunday afternoon taking some macro shots. The entire time I was bent over the same plant. I took over a hundred pictures and did not keep a single shot. Ouch! Well, sometimes it just doesn't happen.
I arrived at my location with about two hours of shooting time. I quickly found an interesting subject and set up the gear - tripod, light stand and translucent reflector to block direct sun light, second stand for main light, shoot-through umbrella and flash. A few minutes after that I'm making pictures. The first shots look OK but too dark. I jack up the flash power. Still too dark. I push up the flash power again. Nope. Not quite. I check the flash output with a light meter. It shows 1/125th, f/16 @ ISO 200. Perfect. Check the camera settings and retry the shot - still too dark. WTF?!?! I pull the camera off the tripod and check the settings again. They are correct. I check to see if I left a filter on the lens. Nope. Hmmmm...
Good thing to remember when using flash - aperture controls flash, shutter speed controls ambient light. If I use a light meter to test the output from my flash and it says f/16 @ ISO 200. I set my camera to the same and I should have a proper exposure of whatever is being hit with the flash. The shutter speed determines the exposure of the background - anything NOT lit with flash.
Back to the shoot. I pull down the umbrella and go bare flash. Not working. I'm getting annoyed. I pop up another stand and another flash hitting the flower from the both sides. Still not getting the light where I want it.
Cue the wind...
I keep plugging away. It's getting more frustrating. I have this tiny flower surrounded on two sides by 580EX IIs and the other side by a tripod. Here comes the wind. The flower is shaking like crazy! I wait it out. Start shooting again. I bump the flower - waiting. More wind - waiting... AAAAAAAAAHHHH!!
What is going on? Either flash is just about four inches from my subject. I check the connections and watch the flashes as they fire. Everything is working. I pump up the flash power and pull out the light meter. f/45!!!! Are you kidding me??? My lens doesn't go beyond f/32! This is just getting silly. I jiggle the settings a bit more before giving up and packing it in.
Back home I review the shots. No keepers. Sadness.
Moral of the story...
Not every time you pick up the camera will be pure magic. Some days it is just not going to happen, especially when you're trying to take a macro shot of some crazy-ass, outer space, black-hole center varietal. Now that I think about it, there were bees everywhere but they wouldn't touch this plant. Hmmmmmmm. Suspicious. Another good thing to remember is if it's not working at one location, try another. Sometimes a fresh location is all you need to get things flowing again.
I always like to end on a positive note. If my shoot goes kind of crappy I try to take a no-miss shot of something completely different to get right "back on the horse" and keep the confidence high. Here's what I shot.
Happiness. :-)
I arrived at my location with about two hours of shooting time. I quickly found an interesting subject and set up the gear - tripod, light stand and translucent reflector to block direct sun light, second stand for main light, shoot-through umbrella and flash. A few minutes after that I'm making pictures. The first shots look OK but too dark. I jack up the flash power. Still too dark. I push up the flash power again. Nope. Not quite. I check the flash output with a light meter. It shows 1/125th, f/16 @ ISO 200. Perfect. Check the camera settings and retry the shot - still too dark. WTF?!?! I pull the camera off the tripod and check the settings again. They are correct. I check to see if I left a filter on the lens. Nope. Hmmmm...
Good thing to remember when using flash - aperture controls flash, shutter speed controls ambient light. If I use a light meter to test the output from my flash and it says f/16 @ ISO 200. I set my camera to the same and I should have a proper exposure of whatever is being hit with the flash. The shutter speed determines the exposure of the background - anything NOT lit with flash.
Back to the shoot. I pull down the umbrella and go bare flash. Not working. I'm getting annoyed. I pop up another stand and another flash hitting the flower from the both sides. Still not getting the light where I want it.
Cue the wind...
I keep plugging away. It's getting more frustrating. I have this tiny flower surrounded on two sides by 580EX IIs and the other side by a tripod. Here comes the wind. The flower is shaking like crazy! I wait it out. Start shooting again. I bump the flower - waiting. More wind - waiting... AAAAAAAAAHHHH!!
What is going on? Either flash is just about four inches from my subject. I check the connections and watch the flashes as they fire. Everything is working. I pump up the flash power and pull out the light meter. f/45!!!! Are you kidding me??? My lens doesn't go beyond f/32! This is just getting silly. I jiggle the settings a bit more before giving up and packing it in.
Back home I review the shots. No keepers. Sadness.
Moral of the story...
Not every time you pick up the camera will be pure magic. Some days it is just not going to happen, especially when you're trying to take a macro shot of some crazy-ass, outer space, black-hole center varietal. Now that I think about it, there were bees everywhere but they wouldn't touch this plant. Hmmmmmmm. Suspicious. Another good thing to remember is if it's not working at one location, try another. Sometimes a fresh location is all you need to get things flowing again.
I always like to end on a positive note. If my shoot goes kind of crappy I try to take a no-miss shot of something completely different to get right "back on the horse" and keep the confidence high. Here's what I shot.

Happiness. :-)
Friday, August 21, 2009
Another wedding tip...
In my last post I listed 7 tips for the next wedding shoot. Tonight I came up with one more. I shouldn't really say "I", though, because the lightbulb appeared above my partner's head before mine.
We were having a few beers and a bite to eat after work this evening and got to talking to our bartender friend Javier. Turns out Javier worked for a few years as a freelance photographer before going back to tending bar. Weddings were his "bread and butter", as he described it but one incident at one wedding really squashed his interest.
How he told the story, he was shooting some of the portraiture for a wedding and the grandmother insisted that he take the photographs in a particular location. Javier knew the location would make for a terrible background and he tried to persuade otherwise but she was not about to budge. Respecting the wishes of the client he took the picture, despite his better judgement. In the end this defining moment became a catalyst for him returning to his old trade of bar tending.
That story made me think of my last wedding shoot. After the ceremony ended and we began with the customary family photos, I remembered how difficult it can be to persuade people to pose effectively.
In the shot below can you guess which person was being a little bit stubborn?

I tried to get people to turn a shoulder to the camera as opposed to facing straight on and looking like a soccer team. Gee, maybe I should used the "don't look like a soccer team" analogy next time. Anyhow, I remembered reading in one of Scott Kelby's Digital Photography books about showing the picture to the client so they can see the "problem" first hand and hopefully make the correction themselves. That is a great tip!
So tip number 8 is: If the subjects are not complying with your posing suggestions show them the LCD and hopefully they understand your point.
Awesome.
We were having a few beers and a bite to eat after work this evening and got to talking to our bartender friend Javier. Turns out Javier worked for a few years as a freelance photographer before going back to tending bar. Weddings were his "bread and butter", as he described it but one incident at one wedding really squashed his interest.
How he told the story, he was shooting some of the portraiture for a wedding and the grandmother insisted that he take the photographs in a particular location. Javier knew the location would make for a terrible background and he tried to persuade otherwise but she was not about to budge. Respecting the wishes of the client he took the picture, despite his better judgement. In the end this defining moment became a catalyst for him returning to his old trade of bar tending.
That story made me think of my last wedding shoot. After the ceremony ended and we began with the customary family photos, I remembered how difficult it can be to persuade people to pose effectively.
In the shot below can you guess which person was being a little bit stubborn?

I tried to get people to turn a shoulder to the camera as opposed to facing straight on and looking like a soccer team. Gee, maybe I should used the "don't look like a soccer team" analogy next time. Anyhow, I remembered reading in one of Scott Kelby's Digital Photography books about showing the picture to the client so they can see the "problem" first hand and hopefully make the correction themselves. That is a great tip!
So tip number 8 is: If the subjects are not complying with your posing suggestions show them the LCD and hopefully they understand your point.
Awesome.
Thursday, August 20, 2009
A funny thing happened on the way to the wedding...
I have done the photography for two weddings now. One, in May, was planned well in advance so I could think, re-think, over-think, plan, read and ultimately execute with satisfying results. The second, shot just a few weeks ago happened a little different.
My partner and I were in Rossland, BC, heading to the wedding when my cell phone beeped alerting me to a new voice message. I picked up the message. It was my sister. The message went something like this - "Amie's mom just called and she wants to know if you brought your camera equipment. The photographer is missing". WOW! Two hours before the wedding and they can't find the photographer who was booked one year in advance. Nice, easy, relaxing wedding day, snapping a few casual pictures from the background. Gone. It's go time! I called my sister back and let her know I had most of what I needed - my 40D, a few flashes and three lenses ( 17-40mm f/4.0L, 24-70mm f/2.8L and 70-200mm f/2.8L). We dash to the grocery store for AA batteries for the flashes and call the bride's father to tell him I was on my way.
I arrive at the bride's parents house in 20 minutes. 30 minutes later I'm taking pictures. The bad: zero time to plan. The good: zero time to get nervous.
My first wedding was a mix of flash and natural light and my flash results were mixed. I had been playing with my 580EX IIs for sometime so I felt confident I could get good results from Canon's ETTL system. Given the limited lighting equipment I was packing I decided to go with the 580EX II on the camera and a Sto-Fen omnibounce on top. Set the flash to ETTL and you're good to go! I remember reading in a book from Rick Sammon that a good place to start with ETTL flash was underexpose by about a stop and up the flash exposure compensation by about a stop. Those settings are simple to manage and gave good results.

Good idea going with ETTL but I quickly discovered an obstacle. The maximum flash sync speed on my 40D is 1/250th of a second. Outdoors on a bright sunny day, even in the shade (where I took a lot of my shots), it's tough to stay at or under 1/250th, especially when shooting at larger apertures, which is what I what for those beautifully blurred backgrounds. One solution is to block light with a polarizer or a neutral density filter. I had the former, not the latter. The polarizer is good because it reduces reflections, saturates colours and it blocks about 1 to 1.5 stops of light. I slapped it on but it was still not quite enough. A 3-stop ND filter would have been better. I also remember hearing David Ziser talk about going above the max sync speed on Kelbytraining. You could probably push the shutter up to 1/320th or 1/400th and still get the top half of the subject lit with flash. Of course, this does not work if flash is the only source lighting your subject. In that case you would get the black bar across the bottom half of the image. There is a good explanation for it here. The 580EX II also has a high-speed sync setting, which I have never tried before and honestly I forgot about it during the shoot. I also didn't remember the David Ziser tip until I started writing this blog - see it's working.
Keeping within 1/250th of a second I'm stopping down to f/8. My backgrounds are much too sharp for my liking as shown in the shot below. It's an OK shot but it could have been better.

Overall I was pretty happy with the results. I made a lot of great pictures, the exposures were good and I don't think I've ever shot so many sharp pictures in one go since I started shooting! However, there is always room for improvement so here are my tips for myself for next time.
1. I didn't have the luxury to scope out good backgrounds and locations ahead of time but there is always time to look for a better place to take good shots. If you can't do it send someone else - your partner, friend, father of the bride, the family dog... whatever. Better location equals better photographs.
2. Slow down, take your time. For those once-in-a-lifetime moments you may have to grab shots on the fly but when it comes to the posed part, take... your... time. It would be better to get a half dozen amazing shots rather than twenty or more so-so ones.
3. When the action is moving make sure your focus is too. AI servo is the mode on Canon cameras.
4. When posing groups always tell them "if you can't see the camera, the camera can't see you".
5. A friend of mine gave me a great tip. He said he loads a few photos on his iPod (or whatever) of other wedding photographers he really likes and references those photos while shooting for inspiration and ideas.
6. Use a tripod. Great for making/directing complex compositions. You worry about getting people in the right places and you don't have to worry about the camera position moving. And, it forces you to slow down and really think about your compositions.
7. Finally, there is always time to try something a bit out of your norm, so do it. You never know what you may come up with.
My favourite shot from the wedding.

More of the wedding shots can be seen here.

My partner and I were in Rossland, BC, heading to the wedding when my cell phone beeped alerting me to a new voice message. I picked up the message. It was my sister. The message went something like this - "Amie's mom just called and she wants to know if you brought your camera equipment. The photographer is missing". WOW! Two hours before the wedding and they can't find the photographer who was booked one year in advance. Nice, easy, relaxing wedding day, snapping a few casual pictures from the background. Gone. It's go time! I called my sister back and let her know I had most of what I needed - my 40D, a few flashes and three lenses ( 17-40mm f/4.0L, 24-70mm f/2.8L and 70-200mm f/2.8L). We dash to the grocery store for AA batteries for the flashes and call the bride's father to tell him I was on my way.
I arrive at the bride's parents house in 20 minutes. 30 minutes later I'm taking pictures. The bad: zero time to plan. The good: zero time to get nervous.
My first wedding was a mix of flash and natural light and my flash results were mixed. I had been playing with my 580EX IIs for sometime so I felt confident I could get good results from Canon's ETTL system. Given the limited lighting equipment I was packing I decided to go with the 580EX II on the camera and a Sto-Fen omnibounce on top. Set the flash to ETTL and you're good to go! I remember reading in a book from Rick Sammon that a good place to start with ETTL flash was underexpose by about a stop and up the flash exposure compensation by about a stop. Those settings are simple to manage and gave good results.

Good idea going with ETTL but I quickly discovered an obstacle. The maximum flash sync speed on my 40D is 1/250th of a second. Outdoors on a bright sunny day, even in the shade (where I took a lot of my shots), it's tough to stay at or under 1/250th, especially when shooting at larger apertures, which is what I what for those beautifully blurred backgrounds. One solution is to block light with a polarizer or a neutral density filter. I had the former, not the latter. The polarizer is good because it reduces reflections, saturates colours and it blocks about 1 to 1.5 stops of light. I slapped it on but it was still not quite enough. A 3-stop ND filter would have been better. I also remember hearing David Ziser talk about going above the max sync speed on Kelbytraining. You could probably push the shutter up to 1/320th or 1/400th and still get the top half of the subject lit with flash. Of course, this does not work if flash is the only source lighting your subject. In that case you would get the black bar across the bottom half of the image. There is a good explanation for it here. The 580EX II also has a high-speed sync setting, which I have never tried before and honestly I forgot about it during the shoot. I also didn't remember the David Ziser tip until I started writing this blog - see it's working.
Keeping within 1/250th of a second I'm stopping down to f/8. My backgrounds are much too sharp for my liking as shown in the shot below. It's an OK shot but it could have been better.

Overall I was pretty happy with the results. I made a lot of great pictures, the exposures were good and I don't think I've ever shot so many sharp pictures in one go since I started shooting! However, there is always room for improvement so here are my tips for myself for next time.
1. I didn't have the luxury to scope out good backgrounds and locations ahead of time but there is always time to look for a better place to take good shots. If you can't do it send someone else - your partner, friend, father of the bride, the family dog... whatever. Better location equals better photographs.
2. Slow down, take your time. For those once-in-a-lifetime moments you may have to grab shots on the fly but when it comes to the posed part, take... your... time. It would be better to get a half dozen amazing shots rather than twenty or more so-so ones.
3. When the action is moving make sure your focus is too. AI servo is the mode on Canon cameras.
4. When posing groups always tell them "if you can't see the camera, the camera can't see you".
5. A friend of mine gave me a great tip. He said he loads a few photos on his iPod (or whatever) of other wedding photographers he really likes and references those photos while shooting for inspiration and ideas.
6. Use a tripod. Great for making/directing complex compositions. You worry about getting people in the right places and you don't have to worry about the camera position moving. And, it forces you to slow down and really think about your compositions.
7. Finally, there is always time to try something a bit out of your norm, so do it. You never know what you may come up with.
My favourite shot from the wedding.

More of the wedding shots can be seen here.

Sunday, August 16, 2009
Do you wanna go faster??
A couple of weekends ago I had to shoot a wedding. I did not start out as the photographer but became him when the other fellow failed to show. I'll have a post on that soon. Anyhow, long story short I had to get a bunch of shots on to my laptop in a hurry to make room and after shooting the wedding I needed to pull the shots to make some quick prints. I was not prepared to do this much work so I didn't have my Canon battery charger. Fortunately I had the battery grip and two freshly charged batteries so the camera did everything with a wee bit of juice to spare.
I got to thinking though that a fast card reader may be a good idea. Not only to save time and battery life but in critical situations where you need to fee up some memory cards it could be a lifesaver. Enter the Hoodman RAW-FW8.
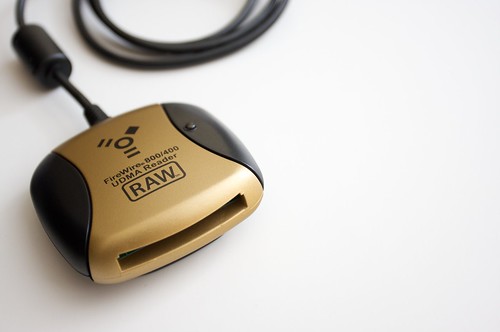
I picked one up this past weekend - $100 from The Camera Store. This little baby copied 386 files (2.98GB) from a 4GB Lexar 233x CF card in 1 minute and 36 seconds. By contrast my Canon 40D copied the same batch in 9 minutes and 17 seconds. WOW! Slower CF cards take longer to copy but at least you're not tying up your camera or depleting its battery.
This gadget will be accompanying me on future shoots.
I got to thinking though that a fast card reader may be a good idea. Not only to save time and battery life but in critical situations where you need to fee up some memory cards it could be a lifesaver. Enter the Hoodman RAW-FW8.

I picked one up this past weekend - $100 from The Camera Store. This little baby copied 386 files (2.98GB) from a 4GB Lexar 233x CF card in 1 minute and 36 seconds. By contrast my Canon 40D copied the same batch in 9 minutes and 17 seconds. WOW! Slower CF cards take longer to copy but at least you're not tying up your camera or depleting its battery.
This gadget will be accompanying me on future shoots.
Saturday, August 15, 2009
I LOVE my Mac(s)!
Yup. I said it. I love 'em!
Without turing this in to a PC versus Mac bash-fest, I just want to say I have used and supported PCs for nearly 25 years, both personally and professionally. I have experienced it all first hand.
My home computer was a Dell PC running Windows XP until July 2008 when Mac came in to my life. I was really burnt out with the Windows "experience" and my PC was lacking the power to handle my photographic needs so it was the perfect time to make a switch.
The transition to Mac was quick and painless and I can honestly say that using the Mac has rekindled my passion for personal computing. Seriously awesome!

Once you go Mac, you'll never go back. :-)
Without turing this in to a PC versus Mac bash-fest, I just want to say I have used and supported PCs for nearly 25 years, both personally and professionally. I have experienced it all first hand.
My home computer was a Dell PC running Windows XP until July 2008 when Mac came in to my life. I was really burnt out with the Windows "experience" and my PC was lacking the power to handle my photographic needs so it was the perfect time to make a switch.
The transition to Mac was quick and painless and I can honestly say that using the Mac has rekindled my passion for personal computing. Seriously awesome!

Once you go Mac, you'll never go back. :-)
Friday, August 14, 2009
I like old stuff.
I like old stuff. Old buildings, cars, machines - whatever. If it's been around for a few decades and shows some good wear and tear then I'm all over it!
On our recent camping trip in to BC, Canada I digressed from my usual tactic of keeping the gas pedal depressed until reaching the destination and actually took some time to "smell the roses". It made for some interesting shots.


The two photos above were from a coffee shop in Nakusp, B.C. The lighting was some sick combination of tungsten, daylight and fluorescent - fluorescent being the dominant light. White balance on fluorescent seemed to give the best results but not perfect. I should have hauled out the grey/white card but I forgot I had it.
These next few shots were from Silverton, B.C. The first from a coffee shop called the "Cup and Saucer", I believe. They had wireless Internet - score!
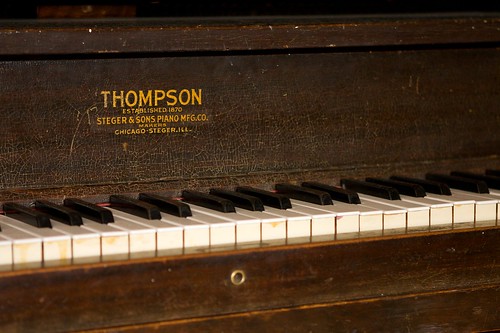
The door shot was taken right beside the coffee shop - my favourite. It was an overcast day so the giant softbox was provided by nature.

Old stuff. I love it!
On our recent camping trip in to BC, Canada I digressed from my usual tactic of keeping the gas pedal depressed until reaching the destination and actually took some time to "smell the roses". It made for some interesting shots.


The two photos above were from a coffee shop in Nakusp, B.C. The lighting was some sick combination of tungsten, daylight and fluorescent - fluorescent being the dominant light. White balance on fluorescent seemed to give the best results but not perfect. I should have hauled out the grey/white card but I forgot I had it.
These next few shots were from Silverton, B.C. The first from a coffee shop called the "Cup and Saucer", I believe. They had wireless Internet - score!

The door shot was taken right beside the coffee shop - my favourite. It was an overcast day so the giant softbox was provided by nature.

Old stuff. I love it!
Thursday, August 13, 2009
And so it begins...
I told myself that when I finally purchased a new camera I would take the time and make the effort to learn how to use it properly. Well, I have been happy snapping away with a D SLR for just over a year now, I have read many books, watched tutorials/DVDs, taken courses and shot nearly 40,000 pictures to date.
During that time I have learned an incredible amount about making good pictures by taking a ton of bad ones! But most important I have had a great time snapping all those photographs and it has been an amazing learning experience.
Recently I wanted to have some sort of mechanism to share my experiences and document my successes and failures in an effort to grow my skills. I figured a weblog was the best conduit for my needs.
And so it begins...

PS Why the ridiculous name? - "Four Chickens and a Camera". It's simply because every other catchy, cool name I could think of was taken so I went with a nonsensical one instead. :-)
During that time I have learned an incredible amount about making good pictures by taking a ton of bad ones! But most important I have had a great time snapping all those photographs and it has been an amazing learning experience.
Recently I wanted to have some sort of mechanism to share my experiences and document my successes and failures in an effort to grow my skills. I figured a weblog was the best conduit for my needs.
And so it begins...

PS Why the ridiculous name? - "Four Chickens and a Camera". It's simply because every other catchy, cool name I could think of was taken so I went with a nonsensical one instead. :-)
Subscribe to:
Posts (Atom)

