This past Sunday I attended a workflow workshop with Nick Didlick which was as a part of the Digital Expo that ran over the weekend. He shared a lot of information and was an engaging and witty presenter. More about Nick and his photography can be found on his website. Also buried amongst oodles of information and pictures is a page containing a plethora of information and links. Check it out.
The workshop was not hands on and it was quite brief at only two and a half hours. Workflow is a pretty intense topic so Nick could not penetrate the depths on any one aspect. However, it was time well spent and a few items resonated with me.
The first thing that stuck with me was Nick seemed to have a lot of software. All sorts of tools, programs as well as the big heavy weights like Photoshop. He also brought a new app to the table I never heard of - Photo Mechanic. Photo Mechanic was an integral part of his workflow. I chose Apple's Aperture for my workflow. There are many others but Adobe's Lightrooom is amongst the most popular. And, nowadays all the apps run on both Mac and Windows. All this is great but the gist of it is, it does not matter which one you use just pick one that suits your needs and get to know it intimately. I cannot stress that enough - know your workflow app inside and out!
Another idea Nick covered as part of the workflow process was metadata. Simply, metadata is data about data. So if your image is the data then the metadata is all the other information about the image but not the image itself. All the information on time, date, aperture, shutter speed, ISO, focal length, etc is metadata. This extra information is usually called EXIF (Exchangeable Image File Format) data. Two other formats were also introduced to store even more metadata. These formats are called IPTC (International Press Telecommunications Council) and XMP (Extensible Metadata Platform), the latter being developed by Adobe. Regardless of the format in which you store this data, the important point is that you take the time to add this metadata when you download images from the camera. It is much easier to do it at download time then to try and reconstruct it later. And, if you're anything like me with an ever-growing stack of images to process, you will never get it done otherwise.
The final idea I want to share is about finding subjects. Nick had a great point about finding and making great pictures in your own backyard - your hometown. He explained that travelling to exotic locations and taking pictures of popular and well known locations is fairly easy and overdone. Do any of us have really amazing pictures of the places where we live? Probably not. I know I don't. So pick up your camera, head outside, wander your city, town, village - whatever - just go make some good pictures in your own backyard.
Keep taking pictures.
Thursday, October 29, 2009
Monday, October 26, 2009
More Fun With Yogis...
I had the privilege to take photos of a number of teachers from Bodhi Tree Yoga this past weekend. We had a great time and captured some fabulous pictures for their web site.
Our venue was an office building downtown, which was chosen for its fantastic glass atrium. I work in that building and walk through the atrium every day. The beautiful, wrapping light always catches my eye. I contacted the property manager and he was generous enough to let us shoot there on the weekend.

The idea for the shoot was to keep it as natural and simple as possible, lighting the yoga instructors with natural light only. The other requirement was to keep the background pure white. It is well known that a white background needs extra light to be pure white. If you don't light it, you get a yucky greyish colour. To keep the background super white I used two Canon 580EX II flashes on stands, set for 1/8th power and a 24mm spread. The flashes were remotely fired using MicroSync triggers and one flash was placed on either side of the background. A few quick test shots made sure things were working as expected.
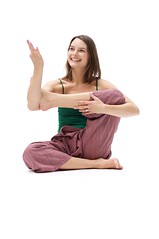
Lighting the instructors and the foreground was the trickier task. For this we were using the natural light streaming in from the atrium. The reason this is trickier is because obviously we have no control over the ambient light - Mother Nature does that. We went from low-light in the morning due to thick cloud and snow, to bright, ample light at mid-morning until around noon and finished with fading light around 2PM. This meant I had to keep watching the exposures to make sure the subject and foreground were sufficiently lit. In the heat of the moment this can be easy to overlook. A 36 inch reflector (thank goodness for helpers) was used to make sure the subject's face had enough fill light. All the exposures were set manually. Spot metering on the subject as well as occasionally using a light meter, I was able to get a good starting point for the exposure. Using that EV as a baseline, I adjusted (typically towards over exposure) to get good foreground and subject exposure. Overexposing the subjects somewhat worked for our "look" but I had to be cautious not to blow out detail. Paying attention to the highlight warnings and the histogram helped to keep things on target.

Besides the fluctuating ambient light the biggest issue was fringing seen on some of the subjects. Fringing or chromatic aberration is a characteristic of lenses and can be amplified by high-contrast scenes and wider apertures. More can be read about it here. I will blog more about it in the future. Regardless, the chromatic aberration did not happen in all situations. It was more prevalent with my EF 50mm f/1.4 than my EF 24-70mm f/2.8L and it also seemed to occur more when the ambient light was low.
Overall things went great and everyone had fun doing the shoot. I will end this post with my favourite shot from that day.
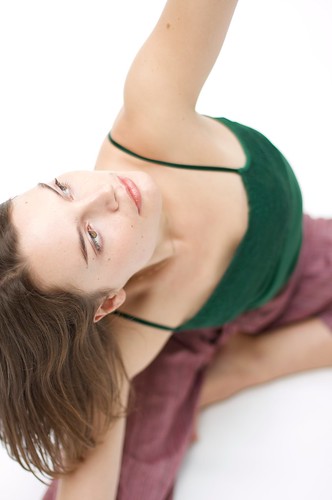
Namaste.
PS The shots shown here are pretty much right out of the camera. Typically the only adjustments were exposure (mostly lowering), slight contrast (when necessary) and sharpening. I prefer to get it right in the camera. :-)
Our venue was an office building downtown, which was chosen for its fantastic glass atrium. I work in that building and walk through the atrium every day. The beautiful, wrapping light always catches my eye. I contacted the property manager and he was generous enough to let us shoot there on the weekend.
The idea for the shoot was to keep it as natural and simple as possible, lighting the yoga instructors with natural light only. The other requirement was to keep the background pure white. It is well known that a white background needs extra light to be pure white. If you don't light it, you get a yucky greyish colour. To keep the background super white I used two Canon 580EX II flashes on stands, set for 1/8th power and a 24mm spread. The flashes were remotely fired using MicroSync triggers and one flash was placed on either side of the background. A few quick test shots made sure things were working as expected.
Lighting the instructors and the foreground was the trickier task. For this we were using the natural light streaming in from the atrium. The reason this is trickier is because obviously we have no control over the ambient light - Mother Nature does that. We went from low-light in the morning due to thick cloud and snow, to bright, ample light at mid-morning until around noon and finished with fading light around 2PM. This meant I had to keep watching the exposures to make sure the subject and foreground were sufficiently lit. In the heat of the moment this can be easy to overlook. A 36 inch reflector (thank goodness for helpers) was used to make sure the subject's face had enough fill light. All the exposures were set manually. Spot metering on the subject as well as occasionally using a light meter, I was able to get a good starting point for the exposure. Using that EV as a baseline, I adjusted (typically towards over exposure) to get good foreground and subject exposure. Overexposing the subjects somewhat worked for our "look" but I had to be cautious not to blow out detail. Paying attention to the highlight warnings and the histogram helped to keep things on target.
Besides the fluctuating ambient light the biggest issue was fringing seen on some of the subjects. Fringing or chromatic aberration is a characteristic of lenses and can be amplified by high-contrast scenes and wider apertures. More can be read about it here. I will blog more about it in the future. Regardless, the chromatic aberration did not happen in all situations. It was more prevalent with my EF 50mm f/1.4 than my EF 24-70mm f/2.8L and it also seemed to occur more when the ambient light was low.
Overall things went great and everyone had fun doing the shoot. I will end this post with my favourite shot from that day.
Namaste.
PS The shots shown here are pretty much right out of the camera. Typically the only adjustments were exposure (mostly lowering), slight contrast (when necessary) and sharpening. I prefer to get it right in the camera. :-)
Friday, October 23, 2009
Art Wolfe
I was fortunate to attend Art Wolfe's keynote presentation tonight as part of the 2009 Digital Photo Expo. The presentation was simply amazing - the photography stunning and Art's insight and humour kept the audience entertained throughout.
Art's passions were ingrained in him early and cultivated throughout his childhood and adolescence. He grew up in Seattle, Washington. His parents worked as wedding photographers and behind their home was a ravine where Art immersed himself in the natural wonders of the forest. An interest in nature, drawing, painting and photography ensued.
You could quickly gather from his presentation that he was passionate about the natural world, its people and its cultures. As he toured us around Asia with his words and photography I was not only impressed by the stories and the pictures, I was amazed at the incredible diversity of peoples that inhabit our delicate planet. What I found truly encouraging was the compassion and generosity displayed by people, who by our standards, have nothing. We are all connected and seeing these images and hearing the stories is a strong reminder of that fact.
I look forward to exploring his website and more of his work. He also does travel workshops, which sound amazing. More about that can be found here.
Beautiful.
Wednesday, October 21, 2009
ISO What?!?!
Both Canon and Nikon recently introduced cameras that go all the way up - WAY, WAY up - to an amazing ISO 102,400. Yes, that is ISO one hundred and two thousand, four hundred. I think my first reaction upon reading that was "whaaaaat??!?!". Of course if you do the "whaaaaaat?!?!" part in a high, squeaky voice, you'll understand my shock.
Now, consider that every full stop increment in ISO (100 to 200, 200 to 400, etc) is twice as sensitive to light as the one before. ISO 200 is twice as sensitive as ISO 100 and ISO 400 is twice as sensitive as ISO 200. As an example, if my exposure settings were 2 seconds at f/4 at ISO 100 the equivalent shutter speed would be 1/500th of a second at ISO 102,400. WOW!
That leaves me with two questions - 1) who needs that? and 2) will it be any good?
Who needs that?
I bumped in to one of my photography instructors (John Chandler - great photographer, wonderful person) at the Canon 7D release party last week. We were discussing this incredible, new ISO range. John, who has been shooting pictures as long as I've been on the planet, asked "who could possibly need that?". I didn't really have a straight up answer. All I could offer was a jesting, "well, I guess if you were shooting luminescent fish in a cave at midnight**, it could be handy". John commented that back in the day going as high as ISO 1600 was rare yet somehow they were still able to make photographs. At the time neither of us could come up with a solid requirement for such an extreme ISO setting.
I'm sure someone needs it, or will quickly find a use for it. I typically do not shoot above ISO 1600 because it is just too noisy on my Canon 40D - quality suffers. This brings us to the next question.
Will it be any good?
To try and come up with a reasonable answer first we must understand what happens when we jack up the ISO. Back in the film days increasing the ISO (it was actually called "ASA" back in the day but let's not go there) meant changing film. When you changed from ISO 100 film to ISO 400 film the recording media became four times more sensitive to light. In these digital times we do not change the sensor (duh) we just make it more sensitive. How? You just amplify the signal. That's all fine and good but when you amplify the signal, you also amplify the noise, which you can read more about here.
So will it be any good? My gut tells me that ISO 102,400 will be pretty darn noisy and unusable but both Canon and Nikon are saying quite the opposite. Gee, why wouldn't they? I guess time will tell if it is just a race between competitors (much like the megapixel race) or it is truly a practical and useful feature.
In the meantime you have to admit it is pretty crazy stuff.
**Credit where credit is due. My friend Ian Ferguson actually came up with the "luminescent fish" part. I originally said "bats". Luminescent fish is funnier.
Wednesday, October 7, 2009
Quick Flash Tip...
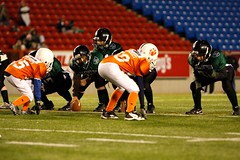
I had the opportunity and pleasure to be able to take pictures of my partner's nephew playing a football game at McMahon Stadium the other night. It was my first football shoot and even though it wasn't the big leagues I had a lot of fun and I got to practice some skills too.
The light in the stadium was pretty decent. It was about 1/160th to 1/200th of a second, f/2.8 (wide open for my 70-200mm) at ISO 1600. That is not too bad. Once I established where the lighting was at, I switched to manual exposure and dialed in my settings. Setting manual exposure tends to give more consistent results, especially when you know the lighting is not going to change. I'm sure for the kids games they only turn on barebones lighting so there may be a few dark patches but generally once you've established the exposure it should be reasonbly close. Televised games would likely be one to two stops better.
Here are a couple of shots from the game.
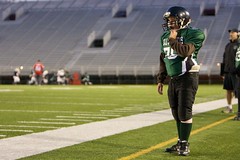
I didn't bother with flash for the game shots, I thought it was best to stick with the ambient provided by the stadium lights. However at the end of the game I decided to augment with flash to make sure I got good coverage on my subject and to freeze motion as I was hand holding at pretty low shutter speeds. Using the flash reminded me of an old but valuable lesson - flash will only properly expose the subject. Not the background, not people a few meters behind the subject and certainly not a whole friggin' stadium! Only the subject, or any other objects on the same plane as the subject will be properly exposed. The reason is something called the inverse square law. Basically the inverse square law states if you double the distance from the light source you get a quarter of the intensity. Triple the distance and you get one ninth the intensity.
Here is a good photographic example. In the picture below I closed down the aperture to f/8 and let my flash illuminate the subject. At those exposure settings the ambient is pretty much zero -it's all flash.

Pretty nasty. It's the typical shot you see from a point-and-shoot camera but it clearly illustrates that the light from the flash lights some of the foreground, the subject and then quickly fades to darkness ten yards later. It sure was handy to be on the field for the yardage. *grin*
A better shot is to set the exposure for the ambient light (or even a stop or two lower) and use the flash to fill in and freeze the subject.
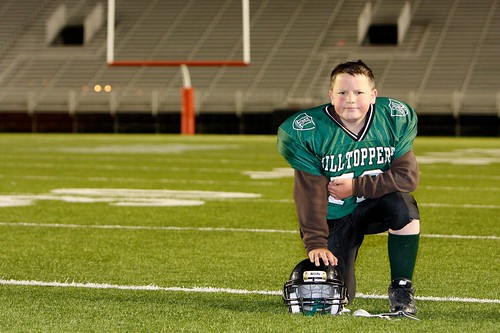
Ahhh, much better.
Of course, if your name is Joe McNally you would just pull out, oh I don't know, 50 or 60 SB-800s (Nikon's equivalent to Canon's 580 EX II) and light the whole darn stadium.
Good stuff.
The light in the stadium was pretty decent. It was about 1/160th to 1/200th of a second, f/2.8 (wide open for my 70-200mm) at ISO 1600. That is not too bad. Once I established where the lighting was at, I switched to manual exposure and dialed in my settings. Setting manual exposure tends to give more consistent results, especially when you know the lighting is not going to change. I'm sure for the kids games they only turn on barebones lighting so there may be a few dark patches but generally once you've established the exposure it should be reasonbly close. Televised games would likely be one to two stops better.
Here are a couple of shots from the game.
I didn't bother with flash for the game shots, I thought it was best to stick with the ambient provided by the stadium lights. However at the end of the game I decided to augment with flash to make sure I got good coverage on my subject and to freeze motion as I was hand holding at pretty low shutter speeds. Using the flash reminded me of an old but valuable lesson - flash will only properly expose the subject. Not the background, not people a few meters behind the subject and certainly not a whole friggin' stadium! Only the subject, or any other objects on the same plane as the subject will be properly exposed. The reason is something called the inverse square law. Basically the inverse square law states if you double the distance from the light source you get a quarter of the intensity. Triple the distance and you get one ninth the intensity.
Here is a good photographic example. In the picture below I closed down the aperture to f/8 and let my flash illuminate the subject. At those exposure settings the ambient is pretty much zero -it's all flash.
Pretty nasty. It's the typical shot you see from a point-and-shoot camera but it clearly illustrates that the light from the flash lights some of the foreground, the subject and then quickly fades to darkness ten yards later. It sure was handy to be on the field for the yardage. *grin*
A better shot is to set the exposure for the ambient light (or even a stop or two lower) and use the flash to fill in and freeze the subject.
Ahhh, much better.
Of course, if your name is Joe McNally you would just pull out, oh I don't know, 50 or 60 SB-800s (Nikon's equivalent to Canon's 580 EX II) and light the whole darn stadium.
Good stuff.
Subscribe to:
Posts (Atom)

