Wednesday, December 30, 2009

Kids

Wow. Kids can be tough to shoot.

A few weeks ago I was asked to take some portraits of my partner's sister's kids. As I am always up for the experience, I happily agreed. The kids and I are good pals so I figured it would be a snap. My only real worry was the venue. We were doing the shoot in my partner's parent's house, which, without mincing words, is a terrible location. It is just way too cramped. To make matters worse her sisters were engaged in Christmas baking (big distraction) and the kids came in late, had being going all day and were tired and hungry. A long day, tired and hungry pretty much described my condition too. Perfect.

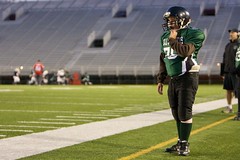
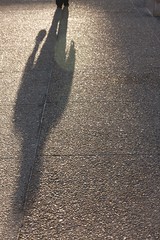
Things started a little rough. There was no room to set up my eight foot seamless background so I decided to improvise with a table cloth. It wasn't horrible but it had some big creases that were not working for me. To counter I kept the backdrop dimly lit, I opened up the aperture to blur it out as much as possible and moved my subject far away from it as I could. An example is below.

_MG_2327 I thought that the background ended up a bit too dark but otherwise my subject looked good. The ugly table cloth had won round one.

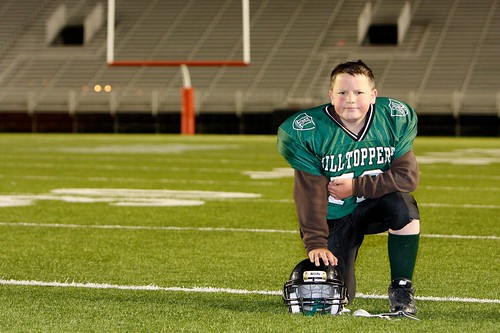
I started the session taking pictures of my partner's niece Felicity, not her nephew Aidan but after taking about twenty pictures of grumpy face, disinterested face, completely annoyed face and I would really like to be doing something else face, I decided to switch subjects. Usually Felicity is an incredibly patient and cooperative subject but not tonight. However with the help of her mom (we all know what happens when mom threatens punishment) we were able to get some keepers._MG_2421

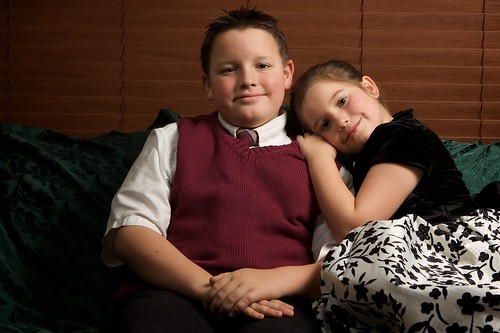
The next task was to get a shot of the both of the kids together. I tried to work them in with the table cloth background but it was not quite wide enough and it was getting harder and harder to hide its ugliness. I decided to switch settings. I took down the backdrop, placed the table cloth on the couch (the couch colour and pattern was way worse than the tablecloth) and moved the kids there. I took a few trial shots and things looked pretty good. The background was not the best but I did like the combination of the brown blinds and green couch. They complimented well. There was an antique looking clock to camera right that I kept in Felicity's solo shot but left out of the group shot. I though the time piece added a bit of interest to the background.

The shot of both kids was a pretty simple light set up. The main light was a 580EX II flash at camera right, shooting through an umbrella. At camera left another 580EX II shooting through an umbrella but this one was set about one and half stops lower than the main light, giving me a 3:1 ratio. This was done for a couple of reasons. One, I wanted to diminish the light on the blinds to de-emphasize them and two, to help contour the faces of the subject, adding depth. The lighting turned out pretty good. I would have liked to play with it a bit more but the kids and I were getting tired and just wanted to be done. They had cookies to decorate and eat and I just wanted to go to bed after a long day. So I settled for adding a bit of a vignette in post-production to darken the background a bit.

Moral of the story...

When you are taking pictures of kids the number one rule is eliminate distractions. If you are not the most entertaining thing in the room (think cookies = more entertaining), you are not going to hold their attention. Even other siblings, friends, moms, dads, grandparents and others can serve as a distraction. I think at one point we even had a hyperactive dog in there too! Simply, the less people the better. Rule number two is probably equally important. Make sure your subjects are rested, watered and fed, which is a rule that certainly can apply to the photographer as well. Being tired, thirsty and/or hungry will also serve as a distraction and likely lead to impatient, uncooperative subjects. And lastly, patience is your best friend. If you follow the rules above and still have trouble getting your subjects to play along then threaten them with physical harm. OK, OK, I am absolutely kidding. Get their mom to do that.

This was my favourite shot of the two of them.

_MG_2380


Monday, December 21, 2009

Help-Portrait

I was very fortunate to be involved in something called Help-Portrait on December 12th. Help-Portrait was an idea started by Jeremy Cowart and it quickly blossomed in to an amazing world-wide event. You can read all about it here.

_MG_2228


The Help-Portrait event in Calgary that I participated certainly was not a big as some but it really felt great to be a small part of a bigger movement but even more important, it felt very good to give my time and skills to a good cause. And seeing the smiles on people's faces made it all worthwhile.

I had such a good time, especially with the kids, they always crack me up. There is nothing more honest then the poses and expressions you get from children. I am so looking forward to next year being an even bigger and busier event.

_MG_2248

Sunday, November 29, 2009

Small Pixels = More Noise

These last few weeks I have barely had a camera in my hands. Instead I have been doing a ton of post processing work (my least favourite activity), taking courses, workshops and other pursuits. I miss taking pictures. Oh well, I am anticipating many more shooting opportunities in December.

I may not have been shooting but I have been reading many blogs and web sites about the new Canon gear. The 7D and the 1D Mark IV. I was lucky enough to attend the Canon 7D launch event about a month back and man, I tell you, it was everything I could do to keep my wallet in my pocket. But experience has taught me not to jump at every new product that comes down the pipeline. When the 50D was introduced I could not wait to hand Canon my money but in the end I chose the 40D as my replacement for my well used Rebel XTi. A year later I could not be happier with my decision. Lately though I have been getting eager to relegate the 40D to backup and bring home a new Canon. I thought for sure the 7D was going to be the one but now I'm not so positive.

Small Pixels Equals More Noise

My 40D has a resolution of 10 megapixels on an APS-C size sensor, which translates in to each light gathering pixel being 5.7 microns in size - same size as my Rebel Xti. One would expect the picture quality to be roughly the same, and, yes it is. When the 50D first came out I tried one out for about a week before settling on the 40D. Why? A couple of reasons. The images were really noisy above ISO 1600 and using DPP (Canon's Digital Photo Professional software) to remove the noise made the images too soft. If I switched on in-camera noise reduction the images also came out too soft. Secondly, I found the 50D images lacking the sharpness of my Rebel XTi. I played around with in-camera settings and post processing techniques but I could not find the sweet spot. Was the 50D, with its increased pixel density, harder to hand hold? Or did the increased pixel density of the sensor inherently produce softer, noisier images? I don't know. But I do know I was not satisfied with the quality so I passed and chose the 40D instead.

One year later and the 7D arrives on the scene. Oh boy was I excited!! As soon as the specifications were out I read all about it. Eight frames per second - awesome! 100% viewfinder - incredible at that price point! All new autofocus system - yah! And then.... 18 megapixels on an APS-C size sensor. Woah! What?!?!? Are you kidding me?!?! Yup. It's true. The Canon engineers found a way to squish even more pixels on that tiny sensor pushing the pixel size to a miniscule 4.3 microns - the smallest of any camera in the EOS line. I was stunned and saddened.

I had to read more about it. Turns out Canon performed some amazing engineering tricks to make 18 megapixels on an APS-C sensor produce high-quality images. But let us skip all the fancy explanations of how and why because I failed grade 11 physics. OK, full disclosure, I didn't try too hard in high school. Clowning around proved to be more fun. Seriously though the general consensus is that smaller pixels have less light gathering ability and thus produce softer images with more noise. I know Canon has truly outdone themselves with the engineering on this sensor but I am still skeptical, especially after my experience with the 50D.

I have read some pretty positive reviews of the camera from The Digital Picture and Rob Gilbraith but there are questions of image quality. However, DPReview.com gave it a "highly recommended" review and had no qualms about the image quality. Personally, for the short time I got to play with it I must admit that the thing feels and handles like a dream and has an incredible feature set, especially at that price. I did a quick cursory check of the image quality and I did find it very similar to the 50D. Similar not in a good way.

As much as I would like to run out and buy one, the most prudent course of action for me will be to rent one for a day, put it through the paces and see if it meets my needs and my tastes. There really is no better way to do it.

One Last Thought...

I cannot help to wonder what if Canon stopped the megapixel madness and capped the 7D at 15 megapixels (same as the 50D) and applied the same engineering techniques to the sensor. Would we be seeing stunning low-light images? Less noise? More sharpness and more dynamic range? Sigh. I can only imagine.

Although I was not impressed with the 50D images on the screen I was quite impressed with the prints. The level of detail was simply amazing. I expect the 7D, with 80% more pixels than my 40D, to produce some pretty amazing output as well. But will it take a bunch of post processing effort to produce stunning prints or screen output?

I am one person who would rather be taking pictures than making them on my computer.


Sunday, November 22, 2009

What's Wrong With This Picture?


_MG_9550-example-clean


I consider this to be a good shot. It was my only my second wedding gig and a job I got completely by surprise. I was not supposed to be the photographer for this wedding, I was a guest. But the task became mine after the original photographer failed to show. The plus about getting the job at the last minute? No time to get nervous. The minus? No time to prepare. You can read about the back story in this post.

This past Saturday I was in my last "Digital Darkroom" class making some prints of the images that I took of a wedding over the summer. On the workstation beside me was Patrick Kornak, one of my instructors from other photography classes. He's a great guy and always very generous of his time to help others. My images caught Patrick's eye and he leaned over and offered a quick critique. Patrick has been shooting pictures since he was 12 years old so if he is willing to offer a little critque, I'll take it.

A little about critque...

An honest critique of your images is absolutely invaluable. Some people fear having their work evaluated by their peers or superiors. I relish it! Sure we can all take it too personally and it can be a little deflating sometimes but if you are fortunate enough to have a skilled and unbiased individual evaluate your images it truly is a fantastic opportunity to learn and grow. My only two pieces of advice when looking for someone to critique your work is a) find someone who knows the craft and b) look beyond friends and family. Unless your mom is Annie Leibovitz, she will probably not give you the unbiased feedback you need.

So what is wrong with this picture?

Really there is nothing "wrong" with it but there are a few things that could be improved.

Technical? The technical is good. Exposure, colour balance, sharp subject - all the basics are there.

Composition? Well, here is where Patrick made some good suggestions. I added some letters to the image below so the trouble spots could be quickly identified.

_MG_9550-example


Let us start with "A". This girl is too close to the subject. She ends up being a bit distracting and we do not see all of her like we do the others. We should probably switch her up with girl "D" or at the very least put some distance between her and the bride.

"B" has pretty much the same problem as "A". She crowds the subject and gets lost behind all the others. She might be better over where "A" was but with a bit of a gap between her and the bride. Despite me constantly reminding people that "if you can't see the camera, the camera can't see you" some people still found a way to get lost. Truthfully though this bunch was great to work with and any one of them getting lost in the shuffle is my fault, not their's.

Mister "C" (the groom) needs one small tweak. Remove the shades! It is minor but I really want to see the eyes of the bride and groom. I'm not so concerned about the rest of the wedding party as they are deeper in the background but the B & G need to be looking good and consistent at all times. If both wanted to wear sunglasses, fine, it is their choice. But to have one with and one without is certainly not the best.

And finally, "D". Her position in the frame is good but Patrick thought she could use a small adjustment to get her looking even better. His suggestion was to have her bend a bit in to one knee and put the weight on her back foot. This will help to accentuate the feminine form. Guys are a bit easier. As long as they aren't making a rude gesture or picking their nose when you snap the picture, you're golden. Ha ha!

So what was good about the shot? Patrick thought the arrangement, although somewhat unconventional, really worked well and he also commended me on the nice leading lines of the train tracks bringing the eyes right to the bride and groom. But more than anything else, the bride and groom loved the shot and their opinion is the most important of all.

Keep shooting pictures and keep on learning.

Sunday, November 15, 2009

The Quest for Creativity...

Creativity. Can it cultivated? Sure. Why not? Do you want to read a really, really long article all about creativity? You can read it on Wikipedia here. If not, you can just read on and I will tell you a bit about how I'm trying to encourage a bit more inventiveness in my own photography.

Several months ago I began a "creative" self-project. The idea was simple. Pack the camera more often and take pictures of anything and everything to spark more imagination. And at the same time and probably more important - think less. A few posts back I revealed that I have a tendency to "over think" pictures. Too much technical, not enough natural.

_MG_0902My creative project has produced a number of "keeper" shots (see photo at right). But more than just making pretty pictures the project has encouraged me to vary my thinking and to try new things - experiment a bit more.

To stimulate the creative juices even more I picked up a copy of A Whack on the Side of the Head. I guess it's one of the creativity classics written over 25 years ago. I like what I have read so far (I'm not quite done yet. I am a super-slow reader and easily...hey, check that out... distracted). I imagine the book is something that can be read again and again when you need help to kick start some fresh ideas.

The project is ongoing and continues to produce some interesting shots. Below is one from the very beginning of the project back in the Summer.

_MG_9466


The frame was something put up by the City to highlight the various landscapes and scenes around the park. I picked a nice composition through the frame, backed up enough to show the entire frame and the surrounding scene, tossed in a little fill flash and voila!

And here is another taken just a few weeks ago.

_MG_1639


The creative project is encouraging new ideas, experimentation and more playfulness. I intend to keep it running for a long, long time.

I guess the only question you need to ask yourself to foster more artistry and imagination in your own images is "I wonder what it would look like if I tried this???".

Have fun!

From White to Black...

About a month back I did some shots for a local yoga studio. They were straight up shots - pure white background using natural light for the subjects and just a bit of flash on the background to make sure it was indeed pure white. I was very pleased with the results! You can read about it and see some of the pictures from the shoot here.

A few weeks ago I did another session with Sasha Bahador who is an amazing yoga instructor and beautiful person. You read more about Sasha on her website. For this shoot we wanted a bit more mystery and not such a sterile, clean look. This time I choose to shoot on a black background and light just the subject with flash.

Black is the opposite of white. Duh. I know that sounds dumb but with a white background we need light to make sure it's not a yucky greyish colour, and, we need a lot of light if we want to make it pure white. For black we have to do the opposite. If we want it pure black we have to be carefully not to allow light to spill over it. Seems easy enough but it can present some challenges. My lighting setup was fairly simple, a Canon 580EX II flash on either side of the subject shooting through an umbrella, triggered with MicroSync remotes. To keep light from spilling on to the background I kept one half of the umbrella cover on, which worked well. And, when called for, the lovely Jen hand held another 580EX II to act as a hair or separation light.

_MG_1544

Most of the pictures where done with a 580 EX II on either side of the subject but on occasion one flash would fail to fire and we would get a completely different look. At first I considered it a "problem" and quickly fixed the issue but after reviewing some of the pictures, it turned out that we liked the look. It gave the pictures more of a dramatic appearance. For a whole series I turned off one of the strobes so that only Sasha's face, torso, arms, etc were lit and let the lower half of the image fall in to shadow.

Sasha brought a beautiful sari with her that we tried desperately to work in to the pictures. As a background I did not think it worked very well. Either it was lit too much or too little - overwhelming or underwhelming the image. Eventually, after much play we finally found a few ideas that worked. For one shot we used the sari as a background, splashed a bit of light on it and made it slightly off centre from the subject. It added a nice bit of interest in the background. I queued Sasha through a few experimental poses and I was able to capture some playful, candid looks.

_MG_1445

We continued to play and one of the final shots turned out to be my favourite.

_MG_1583


Every time I pick up the camera I learn something new and this shoot was no different. I received a gentle reminder that sometimes the best pictures come from a bit of luck, play or experimentation. It's easy to get too focused on one outcome or idea and miss so many other beautiful opportunities - stay flexible. Another important lesson was to take the odd break from shooting, pull some pictures up on the computer and see what is working and what is not. I did that a few times and instantly we came up with some great ideas and found certain poses that we wanted to work a bit more.

Keeping taking pictures and keep learning.

Sunday, November 8, 2009

Which Lens? When?

I attended a two hour "Creative Lens Choice" workshop put on by Darwin Wiggett and The Camera Store today. It was two hours well spent. Darwin is an amazing photographer. His presentations are always rich with information and he is an entertaining and enthusiastic speaker - worth catching if you have the chance.

I wanted to share a one quick bit of information from the workshop that really stuck with me. Just like the name of the today's presentation suggests, it is about making creative lens choices.

You cannot make a creative lens choice unless you actually know a bit about the lens types and the effects they produce. Lenses can be broken down in to three basic categories based on focal length - wide angle, normal and telephoto. Wide angle is typically anything less than the "normal" perspective. Normal perspective is what we see, which is approximately the angle of view produced by a 50mm lens on a full-frame camera. So 14mm, 24mm and a 17-40mm zoom would all fall in to the wide angle category. Telephoto takes us beyond the normal perspective and produces a much narrower angle of view. Lenses like 100mm, 70-200mm zoom and 300mm are examples of telephoto lenses.

Each of these types of lenses have different properties and produces a unique effect. Darwin broke it down by lens type and the effect. It looked something like this:

Wide angle = Big foreground, small background and expanded distance

Normal = Well, normal. How we see things with our own eyes.

Telephoto = Small foreground, big background and compressed distance

Simple.

So next time you are out there shooting pictures think about these lense types, the effects they produce and how you can use that to your creative advantage.

Awesome.

Thursday, October 29, 2009

A Little About Workflow

This past Sunday I attended a workflow workshop with Nick Didlick which was as a part of the Digital Expo that ran over the weekend. He shared a lot of information and was an engaging and witty presenter. More about Nick and his photography can be found on his website. Also buried amongst oodles of information and pictures is a page containing a plethora of information and links. Check it out.

The workshop was not hands on and it was quite brief at only two and a half hours. Workflow is a pretty intense topic so Nick could not penetrate the depths on any one aspect. However, it was time well spent and a few items resonated with me.

The first thing that stuck with me was Nick seemed to have a lot of software. All sorts of tools, programs as well as the big heavy weights like Photoshop. He also brought a new app to the table I never heard of - Photo Mechanic. Photo Mechanic was an integral part of his workflow. I chose Apple's Aperture for my workflow. There are many others but Adobe's Lightrooom is amongst the most popular. And, nowadays all the apps run on both Mac and Windows. All this is great but the gist of it is, it does not matter which one you use just pick one that suits your needs and get to know it intimately. I cannot stress that enough - know your workflow app inside and out!

Another idea Nick covered as part of the workflow process was metadata. Simply, metadata is data about data. So if your image is the data then the metadata is all the other information about the image but not the image itself. All the information on time, date, aperture, shutter speed, ISO, focal length, etc is metadata. This extra information is usually called EXIF (Exchangeable Image File Format) data. Two other formats were also introduced to store even more metadata. These formats are called IPTC (International Press Telecommunications Council) and XMP (Extensible Metadata Platform), the latter being developed by Adobe. Regardless of the format in which you store this data, the important point is that you take the time to add this metadata when you download images from the camera. It is much easier to do it at download time then to try and reconstruct it later. And, if you're anything like me with an ever-growing stack of images to process, you will never get it done otherwise.

The final idea I want to share is about finding subjects. Nick had a great point about finding and making great pictures in your own backyard - your hometown. He explained that travelling to exotic locations and taking pictures of popular and well known locations is fairly easy and overdone. Do any of us have really amazing pictures of the places where we live? Probably not. I know I don't. So pick up your camera, head outside, wander your city, town, village - whatever - just go make some good pictures in your own backyard.

Keep taking pictures.

Monday, October 26, 2009

More Fun With Yogis...

I had the privilege to take photos of a number of teachers from Bodhi Tree Yoga this past weekend. We had a great time and captured some fabulous pictures for their web site.

Our venue was an office building downtown, which was chosen for its fantastic glass atrium. I work in that building and walk through the atrium every day. The beautiful, wrapping light always catches my eye. I contacted the property manager and he was generous enough to let us shoot there on the weekend.

_MG_0964

The idea for the shoot was to keep it as natural and simple as possible, lighting the yoga instructors with natural light only. The other requirement was to keep the background pure white. It is well known that a white background needs extra light to be pure white. If you don't light it, you get a yucky greyish colour. To keep the background super white I used two Canon 580EX II flashes on stands, set for 1/8th power and a 24mm spread. The flashes were remotely fired using MicroSync triggers and one flash was placed on either side of the background. A few quick test shots made sure things were working as expected.

_MG_1259

Lighting the instructors and the foreground was the trickier task. For this we were using the natural light streaming in from the atrium. The reason this is trickier is because obviously we have no control over the ambient light - Mother Nature does that. We went from low-light in the morning due to thick cloud and snow, to bright, ample light at mid-morning until around noon and finished with fading light around 2PM. This meant I had to keep watching the exposures to make sure the subject and foreground were sufficiently lit. In the heat of the moment this can be easy to overlook. A 36 inch reflector (thank goodness for helpers) was used to make sure the subject's face had enough fill light. All the exposures were set manually. Spot metering on the subject as well as occasionally using a light meter, I was able to get a good starting point for the exposure. Using that EV as a baseline, I adjusted (typically towards over exposure) to get good foreground and subject exposure. Overexposing the subjects somewhat worked for our "look" but I had to be cautious not to blow out detail. Paying attention to the highlight warnings and the histogram helped to keep things on target.

_MG_0824

Besides the fluctuating ambient light the biggest issue was fringing seen on some of the subjects. Fringing or chromatic aberration is a characteristic of lenses and can be amplified by high-contrast scenes and wider apertures. More can be read about it here. I will blog more about it in the future. Regardless, the chromatic aberration did not happen in all situations. It was more prevalent with my EF 50mm f/1.4 than my EF 24-70mm f/2.8L and it also seemed to occur more when the ambient light was low.

Overall things went great and everyone had fun doing the shoot. I will end this post with my favourite shot from that day.

_MG_1301

Namaste.

PS The shots shown here are pretty much right out of the camera. Typically the only adjustments were exposure (mostly lowering), slight contrast (when necessary) and sharpening. I prefer to get it right in the camera. :-)

Friday, October 23, 2009

Art Wolfe

I was fortunate to attend Art Wolfe's keynote presentation tonight as part of the 2009 Digital Photo Expo. The presentation was simply amazing - the photography stunning and Art's insight and humour kept the audience entertained throughout.

Art's passions were ingrained in him early and cultivated throughout his childhood and adolescence. He grew up in Seattle, Washington. His parents worked as wedding photographers and behind their home was a ravine where Art immersed himself in the natural wonders of the forest. An interest in nature, drawing, painting and photography ensued.

You could quickly gather from his presentation that he was passionate about the natural world, its people and its cultures. As he toured us around Asia with his words and photography I was not only impressed by the stories and the pictures, I was amazed at the incredible diversity of peoples that inhabit our delicate planet. What I found truly encouraging was the compassion and generosity displayed by people, who by our standards, have nothing. We are all connected and seeing these images and hearing the stories is a strong reminder of that fact.

I look forward to exploring his website and more of his work. He also does travel workshops, which sound amazing. More about that can be found here.

Beautiful.

Wednesday, October 21, 2009

ISO What?!?!

Both Canon and Nikon recently introduced cameras that go all the way up - WAY, WAY up - to an amazing ISO 102,400. Yes, that is ISO one hundred and two thousand, four hundred. I think my first reaction upon reading that was "whaaaaat??!?!". Of course if you do the "whaaaaaat?!?!" part in a high, squeaky voice, you'll understand my shock.

Now, consider that every full stop increment in ISO (100 to 200, 200 to 400, etc) is twice as sensitive to light as the one before. ISO 200 is twice as sensitive as ISO 100 and ISO 400 is twice as sensitive as ISO 200. As an example, if my exposure settings were 2 seconds at f/4 at ISO 100 the equivalent shutter speed would be 1/500th of a second at ISO 102,400. WOW!

That leaves me with two questions - 1) who needs that? and 2) will it be any good?

Who needs that?

I bumped in to one of my photography instructors (John Chandler - great photographer, wonderful person) at the Canon 7D release party last week. We were discussing this incredible, new ISO range. John, who has been shooting pictures as long as I've been on the planet, asked "who could possibly need that?". I didn't really have a straight up answer. All I could offer was a jesting, "well, I guess if you were shooting luminescent fish in a cave at midnight**, it could be handy". John commented that back in the day going as high as ISO 1600 was rare yet somehow they were still able to make photographs. At the time neither of us could come up with a solid requirement for such an extreme ISO setting.

I'm sure someone needs it, or will quickly find a use for it. I typically do not shoot above ISO 1600 because it is just too noisy on my Canon 40D - quality suffers. This brings us to the next question.

Will it be any good?

To try and come up with a reasonable answer first we must understand what happens when we jack up the ISO. Back in the film days increasing the ISO (it was actually called "ASA" back in the day but let's not go there) meant changing film. When you changed from ISO 100 film to ISO 400 film the recording media became four times more sensitive to light. In these digital times we do not change the sensor (duh) we just make it more sensitive. How? You just amplify the signal. That's all fine and good but when you amplify the signal, you also amplify the noise, which you can read more about here.

So will it be any good? My gut tells me that ISO 102,400 will be pretty darn noisy and unusable but both Canon and Nikon are saying quite the opposite. Gee, why wouldn't they? I guess time will tell if it is just a race between competitors (much like the megapixel race) or it is truly a practical and useful feature.

In the meantime you have to admit it is pretty crazy stuff.

**Credit where credit is due. My friend Ian Ferguson actually came up with the "luminescent fish" part. I originally said "bats". Luminescent fish is funnier.

Wednesday, October 7, 2009

Quick Flash Tip...

I had the opportunity and pleasure to be able to take pictures of my partner's nephew playing a football game at McMahon Stadium the other night. It was my first football shoot and even though it wasn't the big leagues I had a lot of fun and I got to practice some skills too.

The light in the stadium was pretty decent. It was about 1/160th to 1/200th of a second, f/2.8 (wide open for my 70-200mm) at ISO 1600. That is not too bad. Once I established where the lighting was at, I switched to manual exposure and dialed in my settings. Setting manual exposure tends to give more consistent results, especially when you know the lighting is not going to change. I'm sure for the kids games they only turn on barebones lighting so there may be a few dark patches but generally once you've established the exposure it should be reasonbly close. Televised games would likely be one to two stops better.

Here are a couple of shots from the game.

_MG_0377
_MG_0327

I didn't bother with flash for the game shots, I thought it was best to stick with the ambient provided by the stadium lights. However at the end of the game I decided to augment with flash to make sure I got good coverage on my subject and to freeze motion as I was hand holding at pretty low shutter speeds. Using the flash reminded me of an old but valuable lesson - flash will only properly expose the subject. Not the background, not people a few meters behind the subject and certainly not a whole friggin' stadium! Only the subject, or any other objects on the same plane as the subject will be properly exposed. The reason is something called the inverse square law. Basically the inverse square law states if you double the distance from the light source you get a quarter of the intensity. Triple the distance and you get one ninth the intensity.

Here is a good photographic example. In the picture below I closed down the aperture to f/8 and let my flash illuminate the subject. At those exposure settings the ambient is pretty much zero -it's all flash.

_MG_0571.jpg


Pretty nasty. It's the typical shot you see from a point-and-shoot camera but it clearly illustrates that the light from the flash lights some of the foreground, the subject and then quickly fades to darkness ten yards later. It sure was handy to be on the field for the yardage. *grin*

A better shot is to set the exposure for the ambient light (or even a stop or two lower) and use the flash to fill in and freeze the subject.

_MG_0574


Ahhh, much better.

Of course, if your name is Joe McNally you would just pull out, oh I don't know, 50 or 60 SB-800s (Nikon's equivalent to Canon's 580 EX II) and light the whole darn stadium.

Good stuff.

Wednesday, September 23, 2009

Sunshine, Yogis and High-speed Sync...

I had the pleasure of doing a shoot with John and Eric Pattison. Brothers, yogis and all around good guys. They needed some shots for their web site and I was happy to help.

_MG_9942


We ended up starting the shoot at 3PM with clear skies and full on sun! The day didn't start out that way of course. I preferred the conditions in the morning and for most of the day where it was bright but overcast. It's like having a giant softbox. But it's Calgary so a particular weather pattern typically never hangs around long enough to be useful.

I was not going to have the brothers staring in to the sun so it was understood from the beginning that fill flash was going to be necessary. I wanted limited depth of field, which meant shooting my 24-105mm f/4.0L wide open. It was evident from the first few test shots that normal maximum flash sync speed of 1/250th of a second was not going to cut it. The test shots were well above that.

I needed a new best friend, quick! The new best friend was high-speed sync. According to the Canon 580EX II manual, high-speed sync flash can synchronize with all shutter speeds and is no longer limited to 1/250th of a second. Cool. The short answer on the difference between normal flash and high-speed sync is with normal flash it is a single, quick burst of light. High-speed sync on the other hand the flash is continually pulsed at a lower power setting creating almost continuous lighting. Normal flash will freeze motion because it is a one-shot, quick burst of light. High-speed sync acts more like continuous lighting so it does not have the same "freeze" properties of normal flash but because you are typically using it at much, much faster shutter speeds, the subject will likely get frozen by the shutter speed. The other caveat is that high-speed sync fires the flash at lower power to maintain the pulsing action so the range is limited. But considering you can sync at any shutter speed, I for one am willing to live with the shortened range. Oh, and, if it wasn't obvious the flash needs to be in ETTL mode so that means it is tethered to or on top of the camera.

So with the flash set to ETTL and high-speed sync I could snap away and not worry about the shutter speed. Nice! I popped a 1/4 cut of CTO (colour temperature orange) on the bare flash for a bit of warmth and I was good to go. For these types of shots I generally set the exposure compensation to one stop (EV -1) below the metered value. Then I use flash exposure compensation (FEC) to bring the the light on my subject up to my liking. You end up with roughly a one stop difference between the background and the subject, which helps to pop the subject off of the background.

My explanation of high-speed sync flash is pretty simple. Ralph Paonessa has a great page on high-speed sync flash here.

_MG_9782

Namaste.

Saturday, September 19, 2009

Patience

Patience. I don't have any. OK, maybe that is a bit of an exaggeration. I have some. I just need to cultivate more.

A couple of weeks ago I did a family portrait shoot for some friends. They were pleased with the results. I was not. I wasn't a train wreck but the results were certainly beneath my capabilities as a photographer. I attribute the less than stellar results to lack of patience, a smidgeon of carelessness and maybe the fact that I was in short sleeves in a gusty 12 degree night, freezing my butt off!

_MG_9387

This picture is a great example of impatience. The exposure is good, it is sharp, good framing, blurred background, etc but there is a not-so-nice shadow cutting in to Terra's face. Boo-urns! Simply taking a bit of extra time to review on the LCD would have caught the error. It could have been easily corrected by swinging the flash a bit more forward or getting Terra's face more in line with her best pal Kona.

Too late for that shoot but we are going to do it again as soon as they have a bit free time.

Tomorrow I have a very important photo shoot so to prepare I am going to do a couple of things. One, I am going look at the work of photographers I admire to get a bit of energy and inspiration. And two, I am going to repeat the chorus from the Guns 'N Roses song "Patience" over and over in my head during the photo shoot.

Little patience, mmm yeah, mm yeah
Need a little patience, yeah
Just a little patience, yeah
Some more patience, yeah
Could use some patience, yeah
Gotta have some patience, yeah
All it takes is patience
Just a little patience
Is all you need

Nice.


Tuesday, September 15, 2009

Go in to the Light...

Today's lunch quest was to find good light and make a picture. You would think that noon, downtown on a clear, bright sunny day would be the worst time to find good light but.... you would be wrong. It's out there, you just have to look.

I took a one day workshop back in July with Parish Kohanim. He spoke emphatically about finding good light - first. At one point Parish took us out of the classroom and in to the common area to seek out the good stuff. Within two minutes he found this amazing patch of light coming through the translucent class ceiling. He called our models over and WOW... I was stunned. What a difference!

Back to today. Downtown, high-noon, bright sunny day amongst all the buildings and skyscrapers. You wouldn't think it but there are many opportunities to find quality light. Shade is the easy answer but I have discovered really impressive light that has been bounced off of few skyscrapers. Maybe it is just a single bounce off of one building or, even better, reflecting off one building to another before dropping on to street level. Now that can be really nice.

After spending most of my lunch surfing the back alleys, I noticed this great patch of light falling on an old bank building. The attractive pillars and background sealed the deal.

Here's the keeper.

_MG_9688


Awesome!

Tuesday, September 8, 2009

Fun with White Balance...

I was surfing back alleys the other night and came across an interesting scene.

People's Lunch
Shooting just before sunset I had my camera's white balance set to cloudy. My Canon 40D manual lists the Kelvin colour temperature value of cloudy to be 6000K. (Wikipedia has an entry on colour temperature here) I shot the first picture (on the right) wide open at f/4.0, 1/25th at ISO 800 as ambient light was getting scarce. My exposure was set to maintain good detail inside the room and so "People's Lunch" and the surrounding brick was visible.

When I reviewed the shot on my LCD the exposure was good but the kitchen light was too yellow. Easy fix. I was shooting with my white balance set to cloudy (6000K) and the kitchen light was likely tungsten (3200K) or white fluorescent (4000K) hence it appeared quite a bit warmer - yellow and orange. A quick flick of the fingers set the white balance to tungsten.

Below is the second shot with white balance set to tungsten.

People's LunchNeat. I was expecting the kitchen light to appear more natural, which it did, but I was surprised with the amazing blue. Don't get me wrong, I knew setting white balance to tungsten would turn all the daylight in the frame blue but I was surprised at the creative effect it produced. This is a simple example of how white balance can be used creatively. My preference is the natural looking brick with the warm, inviting light of the kitchen but the blue shot makes me envision some kind of mysterious moonlit scene. Of course white balance can always be changed later using software but I believe it is more important to get it right in the first place.

The white balance setting is used to make sure whites appear white under various types of lighting. Our eyes do that automatically but the camera needs a bit of help. In most cases it is best to set the white balance for the dominant light source and then small adjustments can be made using software if necessary.

If a mish-mash of lighting types is just too crazy then you can always shoot black and white.

Vern's


Kidding... well, not really. I fancied the shot above but it was some sick combination of daylight (5200K) and fluorescent (4000K) lighting. The two types are close in colour temperature but most fluorescent lights give off a sick greenish colour cast that even after some post production tinkering I could not the image looking completely right. Black and white just ended up looking better.

Sometimes you need a little help...

A great tool for setting a custom white balance is a grey/white card - 18% grey on one side, white on the other. Lastolite makes a product called EzyBalance which is just that. It has 18% grey on one side, white on the other and it folds down in to a small pouch so it is easy to take with you. I have one and it works great and is simple to use. Here is how you do it. Set the camera to manual and meter proper exposure on the grey side being sure that the light hitting your subject is hitting the grey card. Take a shot. Using the same exposure flip the card over and take a shot of the white side. The picture of the white side can be used to set a custom white balance in the camera (check your manual as this varies by manufacturer) and the shot of the grey card, which was also used to meter the light, can be used in post production to correct the white balance using software.

Easy peasy.

There is another good article on setting a proper white balance here.

Tuesday, September 1, 2009

Lines, Textures and Colours, Oh My!

The other night on the way home I finally took a picture of these stairs that I pass many times during the course of a week. They always catch my eye but on this particular night I actually had my camera with me, and oh, the sun was setting too. Here is the keeper shot.

_MG_1206


Let us break down some of the visual elements to see why this photograph works.

Lines

This shot has plenty of strong lines - vertical, horizontal and of course, diagonal. I really liked how the diagonal edge of the left side of the stairs also serves as the boundary between different colours and textures. The diagonal line also draws the eye through the frame to the slice of window at the top. The horizontal lines of the brick and the steps converge on that diagonal. Digital Photography School has a short and sweet article on using diagonal lines here.

Textures

There are plenty of textures in this picture too. The texture of the rusty steps dominate but the brick, to me, is a pleasing texture that compliments the stairs nicely. Although there is little shadow in this particular shot, shadow can be an excellent visual element to amplify the "feel" and depth of texture. Texture brings life to the details. Texture all on its own can even be the subject of a photograph! However, in this case it merely enhances the character of the subject.

Colours

The stairs are completely covered in adjacent colours. Adjacent on the colour wheel, that is. These colours are also are generally understood to be "warm" - yellows, reds, oranges, etc. These warm, analogous colours give the stair case its appealing look. The coloured brick, on the other hand, runs somewhat complementary to the stairs on the colour wheel and it brings contrast to the image.

Putting it together

Now, did I think of all those visual design elements (and more) while I was composing the image? Uh, sort of... the colours and textures drew me to make the picture in the first place and while composing it I was careful to put the diagonal lines where I wanted them. I also framed it to eliminate distracting elements on the sides that I felt would detract from the final image. Shooting the picture near sunset with my polarizing filter increased the contrast and colour saturation. So yeah, I did think of a bunch.

Thinking about the visual elements when composing a photograph is a good thing but I don't believe "thinking" should dominant the process. Most times I am guilty of thinking too much, over thinking an image, instead of allowing emotions and intuition to guide the operation.

My goal is to be quite familiar with these visual design elements but to use them in an intuitive and natural manner, not forced. Just like riding a bike. With time and practice it will be so natural you won't even have to think to do it. :-)

You can read more about compositional elements here.

Sunday, August 30, 2009

Snow Leopard Purrrrrrrs...

I picked up my family pack of Snow Leopard on August 28th - the day it came out. I have been reading about it for months and the feedback had been predominantly positive so why wait?

First upgrade was my laptop. I didn't bother to close down any applications, I just popped in the CD and a few mouse clicks later the upgrade was in motion. Almost precisely 40 minutes later Snow Leopard was up and running. Immediately I opened a bunch of apps and tried some of the new dock and expose features. Everything worked wonderfully. The final test was to leave all those apps running and see how fast it shut down. This was a big improvement! I took about 7 seconds to power off - that is way, way faster than before.

Saturday afternoon I upgraded to Snow Leopard on my iMac. Again, just a few mouse clicks to get it running and about 45 minutes later it is all done with nary a glitch. Impressive. I have used and supported Windows since the very early days of that operating system and I have never had an upgrade go so smoothly on one PC let alone two.

The biggest Snow Leopard changes were under the hood so not much new stuff was readily visible after booting up. I had read about a bunch of tweaks and improvements so of course I gave them a quick spin. Everything worked as advertised. There was, however, one nice surprise along the way. When I bought my Hoodman RAW-FW8 a few weeks back I was a bit annoyed to discover that I had to turn on my external hard drive (to which the Hoodman was daisy chained) in order to see the unit. After upgrading to Snow Leopard the Hoodman now shows up properly when I insert a CF card without me having to turn on the external hard drive. Small fix, big happiness.

Overall I'm happy with the upgrade. The new O/S has a crisper feel than Leopard and the tweaks and improvements I have tried are great. I expect I will come across more "oh, that's nice" moments as I get to know it better over the next few weeks.

Mac World has complete coverage of Snow Leopard here. And a review from PCMag.com can be found here.

I have to wonder if the Windows folks will have it so good when their new O/S comes out in October. I guess we'll find out soon enough. :)

Thursday, August 27, 2009

The Shadow Knows...

John Chandler, a photography instructor of mine, once asked the class, "what is in 95% or more of the pictures you take?". There were many answers, some sensible, some crazy but the correct one was... wait for it... shadow.

Huh, who knew??

So the assignment for that week was to take a picture where the shadow was the subject. Hmmmmmm. I think for the next four days the city was covered in thick, white cloud making the really beefy shadows scarce if not gone altogether. By "beefy" I mean the long, strong, thick shadows you only get at sunrise and sunset. Anyhow after days of little success I was finally able to nab this shot on the way to work.

The Shadow


Nothing super terrific but it completed the assignment.

Tonight was different. Six months and plenty of shots later my eye is a bit more tuned to spotting great light and the accompanying shadow. Nearing sunset I came across a bike leaning against a brick wall. The shadow initially peaked my interest but as I looked around the frame the color and the lines drew my eye. Below was the first shot.

_MG_1054


Not a bad shot but it doesn't tell the whole story.

I started to move around a bit, recomposing the image and looking around the frame. Then I saw the best shadow of all: the tree! I zoomed out wider and turned the camera to portrait orientation and this is what I got.

_MG_1063


Much better! The tree absolutely makes the shot. It frames the picture, adds interest and completes the story.

Making this picture tonight made me think of a couple of tips to share.

1. Don't just stick with one idea, one composition. Shoot tight. Shoot wide. Landscape. Portrait. Add elements. Subtract them. When you start to look beyond the subject so many more possibilities emerge.

2. Shadow is already in most of your pictures anyhow so why not use it to your advantage? It can augment the story, complete it, or, it can even be the story all by itself.

Awesome.

Wednesday, August 26, 2009

This is cool!

I saw this video a while back but it is certainly worth watching again. It's Clay Enos showing how to do street portraits.

You can watch it here.

Awesome.

Monday, August 24, 2009

Sometimes it just doesn't happen...

I spent a couple of hours on Sunday afternoon taking some macro shots. The entire time I was bent over the same plant. I took over a hundred pictures and did not keep a single shot. Ouch! Well, sometimes it just doesn't happen.

I arrived at my location with about two hours of shooting time. I quickly found an interesting subject and set up the gear - tripod, light stand and translucent reflector to block direct sun light, second stand for main light, shoot-through umbrella and flash. A few minutes after that I'm making pictures. The first shots look OK but too dark. I jack up the flash power. Still too dark. I push up the flash power again. Nope. Not quite. I check the flash output with a light meter. It shows 1/125th, f/16 @ ISO 200. Perfect. Check the camera settings and retry the shot - still too dark. WTF?!?! I pull the camera off the tripod and check the settings again. They are correct. I check to see if I left a filter on the lens. Nope. Hmmmm...

Good thing to remember when using flash - aperture controls flash, shutter speed controls ambient light. If I use a light meter to test the output from my flash and it says f/16 @ ISO 200. I set my camera to the same and I should have a proper exposure of whatever is being hit with the flash. The shutter speed determines the exposure of the background - anything NOT lit with flash.

Back to the shoot. I pull down the umbrella and go bare flash. Not working. I'm getting annoyed. I pop up another stand and another flash hitting the flower from the both sides. Still not getting the light where I want it.

Cue the wind...

I keep plugging away. It's getting more frustrating. I have this tiny flower surrounded on two sides by 580EX IIs and the other side by a tripod. Here comes the wind. The flower is shaking like crazy! I wait it out. Start shooting again. I bump the flower - waiting. More wind - waiting... AAAAAAAAAHHHH!!

What is going on? Either flash is just about four inches from my subject. I check the connections and watch the flashes as they fire. Everything is working. I pump up the flash power and pull out the light meter. f/45!!!! Are you kidding me??? My lens doesn't go beyond f/32! This is just getting silly. I jiggle the settings a bit more before giving up and packing it in.

Back home I review the shots. No keepers. Sadness.

Moral of the story...

Not every time you pick up the camera will be pure magic. Some days it is just not going to happen, especially when you're trying to take a macro shot of some crazy-ass, outer space, black-hole center varietal. Now that I think about it, there were bees everywhere but they wouldn't touch this plant. Hmmmmmmm. Suspicious. Another good thing to remember is if it's not working at one location, try another. Sometimes a fresh location is all you need to get things flowing again.

I always like to end on a positive note. If my shoot goes kind of crappy I try to take a no-miss shot of something completely different to get right "back on the horse" and keep the confidence high. Here's what I shot.

_MG_0650


Happiness. :-)

Friday, August 21, 2009

Another wedding tip...

In my last post I listed 7 tips for the next wedding shoot. Tonight I came up with one more. I shouldn't really say "I", though, because the lightbulb appeared above my partner's head before mine.

We were having a few beers and a bite to eat after work this evening and got to talking to our bartender friend Javier. Turns out Javier worked for a few years as a freelance photographer before going back to tending bar. Weddings were his "bread and butter", as he described it but one incident at one wedding really squashed his interest.

How he told the story, he was shooting some of the portraiture for a wedding and the grandmother insisted that he take the photographs in a particular location. Javier knew the location would make for a terrible background and he tried to persuade otherwise but she was not about to budge. Respecting the wishes of the client he took the picture, despite his better judgement. In the end this defining moment became a catalyst for him returning to his old trade of bar tending.

That story made me think of my last wedding shoot. After the ceremony ended and we began with the customary family photos, I remembered how difficult it can be to persuade people to pose effectively.

In the shot below can you guess which person was being a little bit stubborn?

_MG_9416


I tried to get people to turn a shoulder to the camera as opposed to facing straight on and looking like a soccer team. Gee, maybe I should used the "don't look like a soccer team" analogy next time. Anyhow, I remembered reading in one of Scott Kelby's Digital Photography books about showing the picture to the client so they can see the "problem" first hand and hopefully make the correction themselves. That is a great tip!

So tip number 8 is: If the subjects are not complying with your posing suggestions show them the LCD and hopefully they understand your point.

Awesome.

Thursday, August 20, 2009

A funny thing happened on the way to the wedding...

I have done the photography for two weddings now. One, in May, was planned well in advance so I could think, re-think, over-think, plan, read and ultimately execute with satisfying results. The second, shot just a few weeks ago happened a little different.

My partner and I were in Rossland, BC, heading to the wedding when my cell phone beeped alerting me to a new voice message. I picked up the message. It was my sister. The message went something like this - "Amie's mom just called and she wants to know if you brought your camera equipment. The photographer is missing". WOW! Two hours before the wedding and they can't find the photographer who was booked one year in advance. Nice, easy, relaxing wedding day, snapping a few casual pictures from the background. Gone. It's go time! I called my sister back and let her know I had most of what I needed - my 40D, a few flashes and three lenses ( 17-40mm f/4.0L, 24-70mm f/2.8L and 70-200mm f/2.8L). We dash to the grocery store for AA batteries for the flashes and call the bride's father to tell him I was on my way.

I arrive at the bride's parents house in 20 minutes. 30 minutes later I'm taking pictures. The bad: zero time to plan. The good: zero time to get nervous.

My first wedding was a mix of flash and natural light and my flash results were mixed. I had been playing with my 580EX IIs for sometime so I felt confident I could get good results from Canon's ETTL system. Given the limited lighting equipment I was packing I decided to go with the 580EX II on the camera and a Sto-Fen omnibounce on top. Set the flash to ETTL and you're good to go! I remember reading in a book from Rick Sammon that a good place to start with ETTL flash was underexpose by about a stop and up the flash exposure compensation by about a stop. Those settings are simple to manage and gave good results.

_MG_8814


Good idea going with ETTL but I quickly discovered an obstacle. The maximum flash sync speed on my 40D is 1/250th of a second. Outdoors on a bright sunny day, even in the shade (where I took a lot of my shots), it's tough to stay at or under 1/250th, especially when shooting at larger apertures, which is what I what for those beautifully blurred backgrounds. One solution is to block light with a polarizer or a neutral density filter. I had the former, not the latter. The polarizer is good because it reduces reflections, saturates colours and it blocks about 1 to 1.5 stops of light. I slapped it on but it was still not quite enough. A 3-stop ND filter would have been better. I also remember hearing David Ziser talk about going above the max sync speed on Kelbytraining. You could probably push the shutter up to 1/320th or 1/400th and still get the top half of the subject lit with flash. Of course, this does not work if flash is the only source lighting your subject. In that case you would get the black bar across the bottom half of the image. There is a good explanation for it here. The 580EX II also has a high-speed sync setting, which I have never tried before and honestly I forgot about it during the shoot. I also didn't remember the David Ziser tip until I started writing this blog - see it's working.

Keeping within 1/250th of a second I'm stopping down to f/8. My backgrounds are much too sharp for my liking as shown in the shot below. It's an OK shot but it could have been better.

_MG_9772


Overall I was pretty happy with the results. I made a lot of great pictures, the exposures were good and I don't think I've ever shot so many sharp pictures in one go since I started shooting! However, there is always room for improvement so here are my tips for myself for next time.

1. I didn't have the luxury to scope out good backgrounds and locations ahead of time but there is always time to look for a better place to take good shots. If you can't do it send someone else - your partner, friend, father of the bride, the family dog... whatever. Better location equals better photographs.

2. Slow down, take your time. For those once-in-a-lifetime moments you may have to grab shots on the fly but when it comes to the posed part, take... your... time. It would be better to get a half dozen amazing shots rather than twenty or more so-so ones.

3. When the action is moving make sure your focus is too. AI servo is the mode on Canon cameras.

4. When posing groups always tell them "if you can't see the camera, the camera can't see you".

5. A friend of mine gave me a great tip. He said he loads a few photos on his iPod (or whatever) of other wedding photographers he really likes and references those photos while shooting for inspiration and ideas.

6. Use a tripod. Great for making/directing complex compositions. You worry about getting people in the right places and you don't have to worry about the camera position moving. And, it forces you to slow down and really think about your compositions.

7. Finally, there is always time to try something a bit out of your norm, so do it. You never know what you may come up with.

My favourite shot from the wedding.

_MG_9539


More of the wedding shots can be seen here.

_MG_9739

Sunday, August 16, 2009

Do you wanna go faster??

A couple of weekends ago I had to shoot a wedding. I did not start out as the photographer but became him when the other fellow failed to show. I'll have a post on that soon. Anyhow, long story short I had to get a bunch of shots on to my laptop in a hurry to make room and after shooting the wedding I needed to pull the shots to make some quick prints. I was not prepared to do this much work so I didn't have my Canon battery charger. Fortunately I had the battery grip and two freshly charged batteries so the camera did everything with a wee bit of juice to spare.

I got to thinking though that a fast card reader may be a good idea. Not only to save time and battery life but in critical situations where you need to fee up some memory cards it could be a lifesaver. Enter the Hoodman RAW-FW8.

Hoodman RAW-FW8


I picked one up this past weekend - $100 from The Camera Store. This little baby copied 386 files (2.98GB) from a 4GB Lexar 233x CF card in 1 minute and 36 seconds. By contrast my Canon 40D copied the same batch in 9 minutes and 17 seconds. WOW! Slower CF cards take longer to copy but at least you're not tying up your camera or depleting its battery.

This gadget will be accompanying me on future shoots.

Saturday, August 15, 2009

I LOVE my Mac(s)!

Yup. I said it. I love 'em!

Without turing this in to a PC versus Mac bash-fest, I just want to say I have used and supported PCs for nearly 25 years, both personally and professionally. I have experienced it all first hand.

My home computer was a Dell PC running Windows XP until July 2008 when Mac came in to my life. I was really burnt out with the Windows "experience" and my PC was lacking the power to handle my photographic needs so it was the perfect time to make a switch.

The transition to Mac was quick and painless and I can honestly say that using the Mac has rekindled my passion for personal computing. Seriously awesome!

IMG_9975

Once you go Mac, you'll never go back. :-)

Friday, August 14, 2009

I like old stuff.

I like old stuff. Old buildings, cars, machines - whatever. If it's been around for a few decades and shows some good wear and tear then I'm all over it!

On our recent camping trip in to BC, Canada I digressed from my usual tactic of keeping the gas pedal depressed until reaching the destination and actually took some time to "smell the roses". It made for some interesting shots.

_MG_0016_MG_0009

The two photos above were from a coffee shop in Nakusp, B.C. The lighting was some sick combination of tungsten, daylight and fluorescent - fluorescent being the dominant light. White balance on fluorescent seemed to give the best results but not perfect. I should have hauled out the grey/white card but I forgot I had it.

These next few shots were from Silverton, B.C. The first from a coffee shop called the "Cup and Saucer", I believe. They had wireless Internet - score!

_MG_8338


The door shot was taken right beside the coffee shop - my favourite. It was an overcast day so the giant softbox was provided by nature.

_MG_8398


Old stuff. I love it!

Thursday, August 13, 2009

And so it begins...

I told myself that when I finally purchased a new camera I would take the time and make the effort to learn how to use it properly. Well, I have been happy snapping away with a D SLR for just over a year now, I have read many books, watched tutorials/DVDs, taken courses and shot nearly 40,000 pictures to date.

During that time I have learned an incredible amount about making good pictures by taking a ton of bad ones! But most important I have had a great time snapping all those photographs and it has been an amazing learning experience.

Recently I wanted to have some sort of mechanism to share my experiences and document my successes and failures in an effort to grow my skills. I figured a weblog was the best conduit for my needs.

And so it begins...

_MG_5401

PS Why the ridiculous name? - "Four Chickens and a Camera". It's simply because every other catchy, cool name I could think of was taken so I went with a nonsensical one instead. :-)