This is what I came up with.
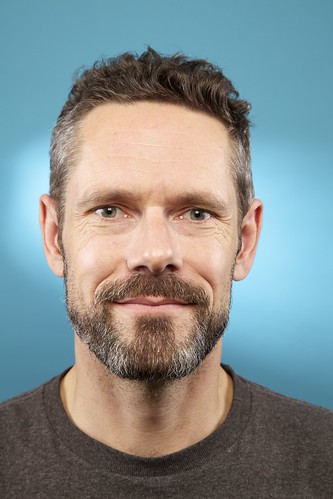
That shot took about two and a half hours. Phew! Self portraits certainly test the patience and can be quite time consuming. If you want to know more how I developed the shot, read on.
The basic idea for the shot came from Jeremy Cowart's Twitter profile shot. It was a close up head and shoulders shot, quite bright with noticeable hot spots on the sides of the face, forehead and upper cheeks. It had a blue background and obvious post-processing, which gave it an edgier look and somewhat desaturated colour. I am not as capable as some in deconstructing photographs but I thought it was a pretty good assessment.
Seemed easy enough. Below is the set up shot demonstrating what I came up with to re-create the shot.
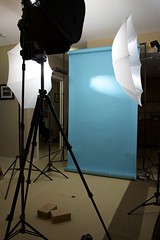
My camera was on a tripod (obviously) and I put a softbox right above it angled slightly down but not full on blasting the subject (me). Ninety degrees to camera left and right I added a shoot-thru umbrella to add highlights on the sides of the face. Now, my highlights do not look like Jeremy's. I'm thinking he used strip lights, which I don't have, or perhaps some cool light modifier that I don't even know about. (note: subtle reference from the movie "Old School" in that last sentence) Anyhow, I tried a couple of different snoots before settling with the umbrellas. They didn't bring quite the same effect but overall I liked what I was seeing.
The final piece of the lighting puzzle was the highlight on the background. In the reference picture, the highlight is much bigger than the one I produced. I have two snoots. One produces a very small, tight circle and one produces a larger, blob shaped oval-y kind of thing. I used the latter. With more patience and time I probably would have fashioned one out of a cereal box and gaffer tape. Kind of a MacGyver meets David Hobby sort of thing but it was getting late so I went with what I had.
It took a bit more effort to tune the lighting, adjusting the power of the strobes to get a really bright exposure while just starting to see a few blown highlights.
With the camera sitting on a tripod and pre-focussed it was just a matter of putting a decent expression on my face and tripping the shutter with a hand-held remote. The shutter tripping is easy. Decent expression? That's hard. Getting in front of the camera makes me appreciate just how hard it is for people when I ask for poses and expressions. My usual tactic is just to talk to people or crack jokes until I get the look I want. Talking to myself or telling myself jokes wasn't going to work and I'm not one of those people who can just produce an amazing, genuine smile on command so I just tried to think of what makes me happy. It seemed to work. After 30 or 40 tries and a few props I had enough keepers.
The final touch was the post processing. I am no Photoshop expert and am at pretty much a loss when it comes to the fancy stuff. So, the best I could do was to desaturate the image a touch and add a high-pass filter with hard light to give it an edgier feel.
Here is what I came up with.

Not too bad.
Keep shooting.


No comments:
Post a Comment